Getting Started With Quicken

Introduction
In these historically tough economic times it is more important than ever that you take control of your personal financial situation. You know that you have to pay off those credit card bills, and you really need to start saving for retirement, as well as meet other financial goals.
You may have heard the old adage “People don't plan to fail, they fail to plan”. To meet your financial goals you need a plan, and personal finance software like Intuit's Quicken provides the necessary tools to implement such a plan. The initial setup requires some time investment, but if you do it properly it will require minimal time to do routine chores, and you will quickly be able to develop a plan to meet your financial goals.
Although this blog is written primarily for new users, if you are already using Quicken or another personal finance software, it's not too late to go back and refine your methods using the tips that follow. Although software specifics may be different, the principals outlined here are universal.
Note: For illustration purposes I am using Quicken Home & Business 2010, 64-bit version. Some illustrations may vary from other versions of Quicken.
Part I – Basic Setup
To get from financial point A (where you are now) to financial point B (your goals), you first have to know where point A is. So the first step in finding point A is gathering all your financial information - bank statements, credit card statements, etc. - and entering the balances into Quicken. When you are done you will have a “snapshot” of your financial position.
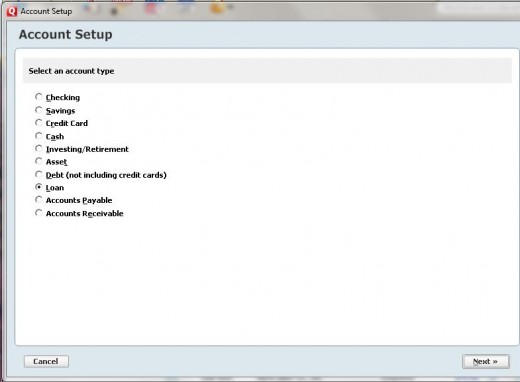
Quicken's initial account setup only guides you through setting up one bank account. The next step is to set up accounts in Quicken for each type of account you have. Select the Tools menu from the top bar, then select Add Account (in older versions it is Account List, then Add Account). Optionally, you can simply click the Add Account button at the bottom left of the screen. You will see a listing of account types.

Be careful to choose the correct type of account, as this will determine how Quicken reports account balances. If the account is a mortgage, auto loan, student loan or any other kind of loan with a set monthly payment amount, select loan account. For revolving credit accounts for which the monthly payments vary, including bank lines of credit, choose the credit card option. Even though an account may not technically be a credit card, if the balance changes every month Quicken handles the transactions differently than loan accounts with a set payment. See Part II below for more detailed suggestions about how to set up your loan accounts.
First gather the last statement for each bank, loan and credit card account you have. For accounts other than bank accounts (credit cards, loans, etc.), use the last statement balance as your beginning balance. Assuming all the charges are legitimate, the balance will be correct. Credit card companies will wait a few days after the closing date for all the charges to be posted before calculating a final balance, and loan companies will calculate the new balance based upon payments you made during the month, adjusted for interest.
When you set up a bank account or credit card in Quicken you will be prompted for your bank information, and Quicken will try to match it to known banks for the purpose of providing online updates to your accounts. For now, you can match them up if they are listed, but I recommend against using the online update function for reasons I will discuss later.
Next pull together all your credit card receipts for purchases made after your last credit card statement and enter them into your Quicken credit card Accounts. A good practice is to keep your receipts in an envelope until you are sure that the correct amount is charged. Of course, if it's a purchase that involves a warranty, save the receipt at least until the warranty expires.
After the initial setup, try to enter new items as you incur them. Make a habit of spending a few minutes at least once a week to input these items while you check your e-mail or do other computer activities. This way you're not spending a lot of time at the end of the month playing catch-up.
When you receive your monthly bank and credit card statements, be sure to reconcile them using the Reconcile function under Account Actions (older versions have a stand-alone Reconcile button at the top of the register). Check the boxes next to the deposits and checks that have cleared, simultaneously ticking off the items on the statements. It is just as important to reconcile credit card accounts as it is your bank account.
Unfortunately, loan accounts in Quicken do not have a “reconcile” option, and you cannot print a reconciliation report. Instead you have to check off the boxes next to the amount column (labeled “clr”). The first time you check the box you will see “c” for “cleared”. Click the box a second time and you will see “R” for “reconciled”. You can alternatively reconcile your bank and credit card accounts this way as well, but the carry-forward information will not be updated.
Finally, set up online access to all your bank, credit card and loan accounts and regularly compare your Quicken transactions to what is posted online. In this day and age, fraud is rampant, and you should do everything you can to protect your hard-earned money.
Tip: Quicken includes an option to download transactions directly from your accounts. This may be the quickest and easiest way to input your transactions, but I strongly recommend that you do not use this function. If you do, you will be entrusting the bank and credit card companies to assure that all transactions are legitimate. There is no way they can verify that every transaction for every customer is valid. The burden is on you to verify that you made the purchases. It is much safer to enter your receipts yourself and check them against what the bank or credit company has recorded. This way, any fraudulent transactions will immediately stand out. The sooner you can catch fraud, the quicker you can put a stop to it and possibly catch the thief.
To summarize: 1) Set up accounts for every bank account, loan and credit card you have in your name, 2) Enter transactions on a regular basis, and 3) Verify that the transactions reported by your bank/credit card company agree with what you have recorded.
Part II – Automating Routine Tasks
Now that you have the basic setup, it's time to refine some other aspects of Quicken to streamline its use as much as possible. By setting up monthly bills and other routine items to either 1) post automatically or 2) remind you to pay them, you'll save yourself a lot of data entry.
Monthly Bills:
Monthly bills such as utilities should be set up as recurring entries. Although the monthly amounts will vary, it is a simple task to change the amount manually before or after it posts to the register.
To set up a recurring entry, go to Tools, Manage Bill & Income Reminders( Scheduled Bills & Deposits List in older versions), Create New, Scheduled Bill or Deposit (I'll address the Paycheck option next).
The setup options default to a typical monthly billing cycle based upon the date you enter. If the bill is automatically deducted from your bank account, use the Automatically Delivery method; if you must write the check manually, use the Mail method. Be sure to give yourself enough notice for check writing. I suggest scheduling payments at least a week before the due date to compensate for mailing and processing time. I like to set aside about a half hour every Sunday for bill paying, and I schedule the payment dates accordingly.
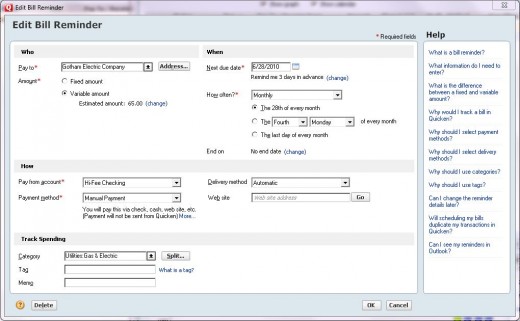
Note the "fixed" and "variable" amount options on the screen. The variable option is intended for use with repetitive bills with varying amounts, such as utilities. If you choose this option, Quicken will estimate future amounts. I prefer to use the fixed option and change the amount when the bill comes in. It's a matter of personal preference.
At the top of the Edit Bill Reminder page you will see "Remind me 3 days in advance (change)". Three days is probably enough warning for most people, but if you need more or less, you can change it here. This will trigger a red flag next to the account from which the bill is to be paid. Your Home page also lists all bills due soon (or overdue).
Paychecks:
A common shortcut people take when setting up Quicken is entering their net paycheck amount in the bank register instead of the gross amount less the deductions. Although recording your net pay is the easiest way, it is not the best way. The more detail you provide Quicken, the better the information it will produce.
Wages and withholding data can also be exported to TurboTax if you are the type of person who likes to do their own tax returns, but only if you enter the detailed pay stub line items. Of course you will have to make sure the entire tax year's paychecks have been entered if you want to export the data.
To set up the paycheck reminder you will need your latest pay stub. Select Tools, Manage Bill & Income Reminders, Create New, Paycheck. Follow the guide, answering the questions as needed.
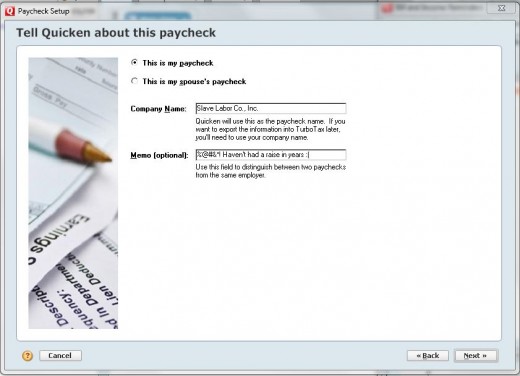
The second screen defaults to the “I want to track net deposits only” option. Change the selection to “I want to track all earnings...”.
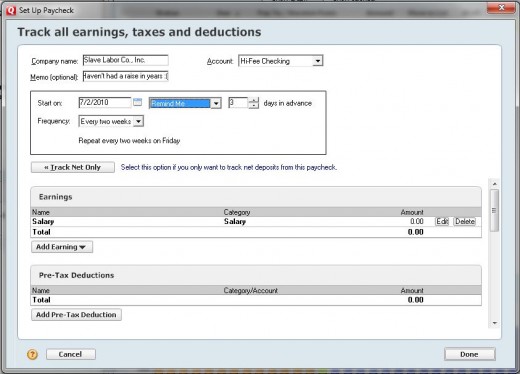
Set the date, reminder type, etc. Click on the Edit boxes on each line item by category and enter the appropriate amounts.
Note that there are line items already set up for the most common withholdings. If you need to add a new deduction you will have to assign a tax return line number in order for it to be correctly exported to TurboTax. You can add a Category by clicking Add Deduction and typing the name of the new tax deduction. You will be taken to this screen:
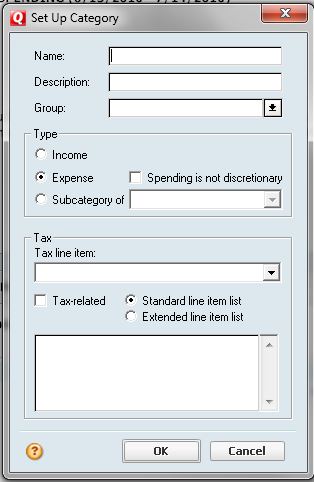
After filling in the Name, etc., pull out last year's tax return and determine where the payroll deduction was reported on your Form 1040. Scroll through the Tax line item list to match the item to the tax line. A new Category can also be added by selecting Tools, Category List, New.
Follow these steps and your paycheck will be on auto pilot until your next raise, unless of course your paycheck varies week to week. If that is your situation, you will have to manually adjust the gross income and deduction amounts to match each paycheck.
Loans:
Click the Add Account button at the bottom left of the screen (or from the Tools menu) and select “Loan”.
EasyStep will ask you if you would like to Borrow Money or Lend Money. For this illustration I will assume you are borrowing money, but you may want to use the Lend Money option to keep tabs on that $100 your brother borrowed. Fill in the required information by following the screens. You will be given a chance to review and make changes before saving.
When you are done entering the loan information, Quicken will ask you if there is an asset associated with the loan.
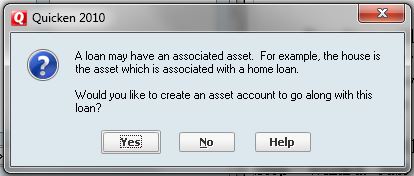
Let's assume we have just set up an auto loan. Set up an associated asset for the car by entering the description and value.
Tip: If you've had the car a while and don't know the value, you can find out how much the vehicle is worth at www.kbb.com (Kelley Blue Book).
You can print an amortization schedule by selecting the Net Worth button at the top of the screen, then Loan Details, and Payment Schedule tab. It's a good idea to print a copy and keep it in a file with your loan statements. Note that Quicken's principal & interest calculations may vary slightly from your lender's due to differences in calculation methods.
A better method for setting up secured loans is to set up the asset first, followed by the associated loan, e.g. auto loan, mortgage, etc.. This method is illustrated next.
Mortgages:
Mortgages are a special situation because they usually have an escrow account attached. Mortgage providers want to be sure that your real estate taxes and homeowners insurance are paid on time. They have a vested interest in the value of your home, and they want to be sure that their interest is not compromised by tax liens, fire damage, etc..
Click the Add Account button at the bottom left of the screen (or from the Tools menu) and select Asset, then select “House”. After you have answered the questions regarding purchase date & amount, etc., you will asked if there is a mortgage on this house. Select “yes” to set up a new mortgage account associated with the house.
Quicken will hand you off to the EasyStep routine as described in the Loans section above. For some reason there is no default Category for mortgage interest. When you get to the Edit Loan Payment screen, the Category for Interest defaults to “Interest Exp”. You will need to replace this with a new Category for Mortgage Interest. If you intend to export tax information to TurboTax, you must associate a tax return line with the Mortgage Interest Category. Remember, only mortgage interest is tax deductible: no other type of consumer interest is deductible.
You can account for real estate escrow payments in one of two ways; 1) expense the amounts currently as Real Estate Taxes and Homeowners Insurance (the simpler but less accurate way), or 2) you can set up a Mortgage Escrow Account to accumulate payments and manually record payments when your mortgage company pays them.
To expense currently, select Edit and type in “Real Estate Taxes” in the Category box. Follow the steps for setting up a new Category. As with mortgage interest, Quicken does not have a default Category set up for real estate taxes (I'm beginning to wonder if anyone at Intuit owns a house). Quicken does have a Category called “Insurance”, however. You can either create a Subcategory of this Category called Insurance:Homeowners, or simply set up a new Category called Homeowners Insurance.

If you use this method you cannot export the Real Estate Taxes amount to TurboTax, as it will not be in agreement with the Form 1098 you will receive from the mortgage company. Homeowners insurance is not tax deductible.
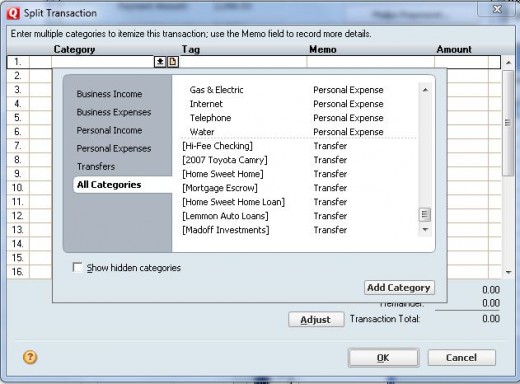
Although the second method for recording real estate taxes and homeowners insurance will give you more accurate information, you will have to manually adjust the Mortgage Escrow Account two or three times a year. To set up a Mortgage Escrow Account, first use the Add Account function, Asset, Other Asset. Name the new account Mortgage Escrow (or whatever you wish). When quicken asks if there is a loan associated with this loan, select “No”. Then when you Edit the “Other amounts in payment”, click the Category drop down list, select All Categories, and scroll to the bottom to locate the Mortgage Escrow Account you just set up.
Note that you will still have to add a Category for Real Estate Taxes to record the payments your mortgage company makes from escrow.
Part III – Budgeting and Cash Flow
If you've followed my recommendations to this point you should have enough information at your disposal to craft a budget. Since budgeting is a personal thing and every individual has different goals and lifestyles, I can't tell you what your budget should look like. But I can offer a few suggestions.
First, write down specific financial goals on paper, rather just keep them in your head. Write down what you want to accomplish, setting due dates and working backward to formulate a plan for achieving that goal. Don't just think “I'm going to pay off my credit cards”. State in writing that you will pay off XYZ credit card in full by XX/XX/2011. Then determine how much extra per month you need to pay to eliminate that debt by that date, and adjust your other spending habits to make that extra payment.
To set up a budget in Quicken, click Planning, Budget. I suggest using the default Automatic option at first to give you a starting point.
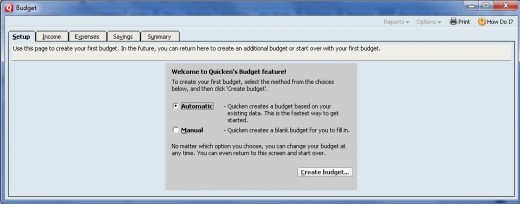
The Automatic option is based on actual expenses, but if your goal is to reduce expenses you will need to make some manual adjustments. Determine where you can cut expenses and adjust individual budget items to reflect your goal. Quicken will warn you with a pop up message when you exceed your budget for a given Category.
You may want to track your cash balances with Quicken. The simplest way to get a good picture of your projected cash balances is to simply open the Calendar:
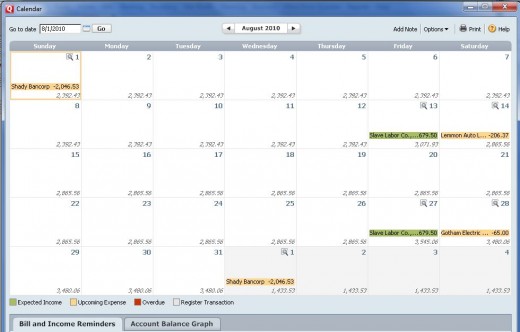
You will see a daily running balance for your bank account. If you have multiple accounts, you can choose to see the running balance for individual accounts or your account totals. Click on the Account Balance Graph tab to see a visual representation of your cash balances. If the account balances go up over time, you have a positive cash flow. If the balances are going down it's time to sharpen that pencil and do some serious cost cutting.
Happy budgeting!
![Quicken Premier 2018 – 27-Month Personal Finance & Budgeting Software [PC/Mac Box] – Amazon Exclusive [Old Version]](https://m.media-amazon.com/images/I/51zmXuiUKUL._SL160_.jpg)


